
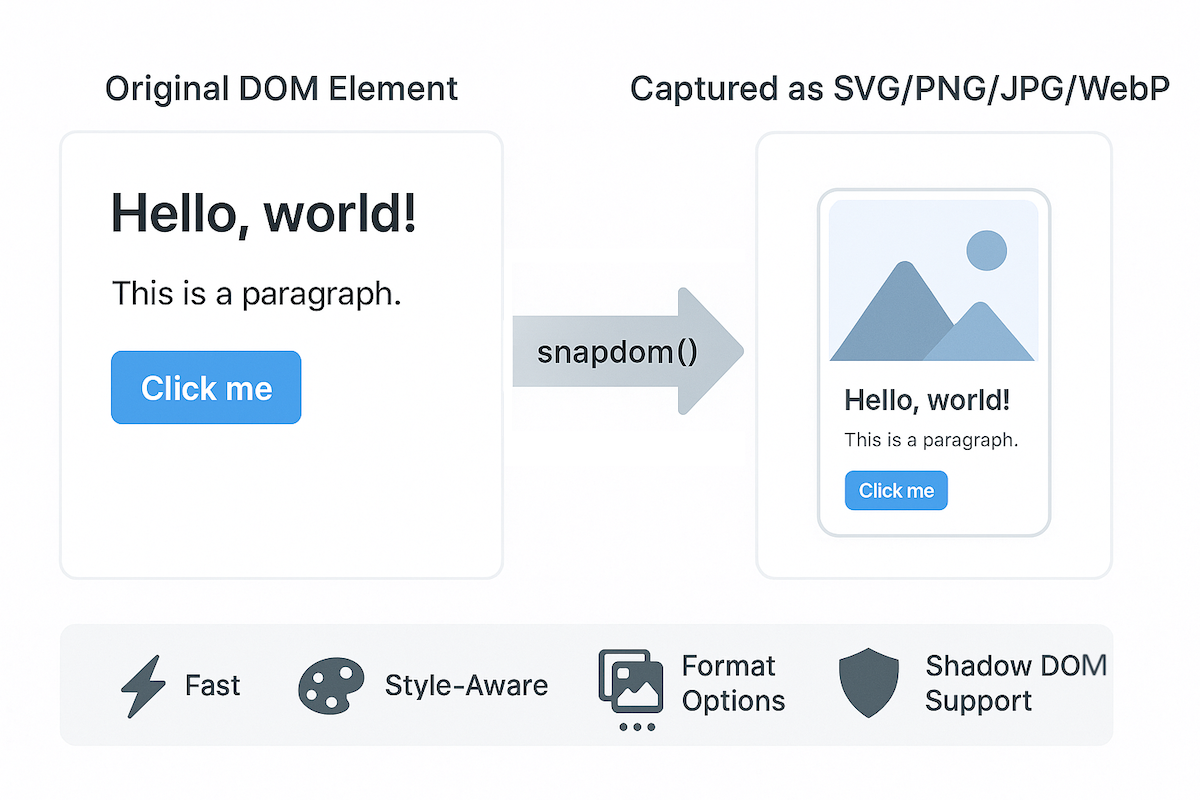


snapDOM is a fast and accurate DOM-to-image capture tool built for Zumly, a zoom-based view transition framework.
It captures any HTML element as a scalable SVG image, preserving styles, fonts, background images, pseudo-elements, and even shadow DOM. It also supports export to raster image formats and canvas.
- 📸 Full DOM capture
- 🎨 Embedded styles, pseudo-elements, and fonts
- 🖼️ Export to SVG, PNG, JPG, WebP, or
canvas - ⚡ Ultra fast, no dependencies
- 📦 100% based on standard Web APIs
https://zumerlab.github.io/snapdom/
npm i @zumer/snapdom
yarn add @zumer/snapdom
<script src="https://cdn.jsdelivr.net/npm/@zumer/snapdom/dist/snapdom.min.js"></script>
<script src="snapdom.js"></script>
import { snapdom } from './snapdom.mjs';
<script type="module">
  import { snapdom } from 'https://cdn.jsdelivr.net/npm/@zumer/snapdom/dist/snapdom.mjs';
</script>
const el = document.querySelector('#target');
const result = await snapdom(el, { scale: 2 });

const img = await result.toPng();
document.body.appendChild(img);

await result.download({ format: 'jpg', filename: 'my-capture' });
const el = document.querySelector('#target');
const png = await snapdom.toPng(el);
document.body.appendChild(png);

const blob = await snapdom.toBlob(el);
Returns an object with reusable export methods:
{
  url: string;
  toRaw(): string;
  toImg(): Promise<HTMLImageElement>;
  toCanvas(): Promise<HTMLCanvasElement>;
  toBlob(options?): Promise<Blob>;
  toPng(options?): Promise<HTMLImageElement>;
  toJpg(options?): Promise<HTMLImageElement>;
  toWebp(options?): Promise<HTMLImageElement>;
  download(options?): Promise<void>;
}
| Method | Description |
|---|---|
snapdom.toImg(el, options?) | Returns an HTMLImageElement |
snapdom.toCanvas(el, options?) | Returns a Canvas |
snapdom.toBlob(el, options?) | Returns an SVG Blob |
snapdom.toPng(el, options?) | Returns a PNG image |
snapdom.toJpg(el, options?) | Returns a JPG image |
snapdom.toWebp(el, options?) | Returns a WebP image |
snapdom.download(el, options?) | Triggers download in specified format |
All capture methods accept an options object:
| Option | Type | Default | Description |
|---|---|---|---|
compress | boolean | true | Removes redundant styles |
fast | boolean | true | Skips idle delay for faster results |
embedFonts | boolean | false | Inlines fonts (icon fonts always embedded) |
scale | number | 1 | Output scale multiplier |
width | number | - | Output specific width size |
height | number | - | Output specific height size |
backgroundColor | string | "#fff" | Fallback color for JPG/WebP |
quality | number | 1 | Quality for JPG/WebP (0 to 1) |
useProxy | string | '' | Specify a proxy for handling CORS images as fallback |
type | string | svg | Select png, jpg, webp Blob type |
exclude | string[] | - | CSS selectors for elements to exclude |
filter | function | - | Custom filter function ie (el) => !el.classList.contains('hidden') |
Use the width and height options to generate an image with specific dimensions.
Examples:
1. Fixed width (proportional height) Sets a specific width while maintaining the aspect ratio. Height adjusts proportionally.
const result = await snapdom(element, {
  width: 400 // Outputs a 400px-wide image with auto-scaled height
});
2. Fixed height (proportional width) Sets a specific height while maintaining the aspect ratio. Width adjusts proportionally.
const result = await snapdom(element, {
  height: 200 // Outputs a 200px-tall image with auto-scaled width
});
3. Fixed width and height (may distort image) Forces exact dimensions, potentially distorting the image if the aspect ratio differs.
const result = await snapdom(element, {
  width: 800,  // Outputs an 800px × 200px image (may stretch/squish content)
  height: 200
});
Note: If scale is different from 1, it takes priority over width and height.
Example: { scale: 3, width: 500 } ignores width and scales the image 3x instead.
By default, snapDOM loads images with crossOrigin="anonymous" or crossOrigin="use-credentials". In case fails to get the images, useProxy can be used to deal with CORS images:
const result = await snapdom(element, {
  useProxy: 'your/proxy/' //Example: 'https://corsproxy.io/?url=' or 'https://api.allorigins.win/raw?url='
});
{
  format?: "svg" | "png" | "jpg" | "jpeg" | "webp"; // default: "png"
  filename?: string;         // default: "capture"
  backgroundColor?: string;  // optional override
}
The preCache() function can be used to load external resources (like images and fonts) in advance. It is specially useful when the element to capure is big and complex.
import { preCache } from '@zumer/snapdom';

await preCache(document.body);
import { snapdom, preCache } from './snapdom.mjs';
    window.addEventListener('load', async () => {
    await preCache();
    console.log('📦 Resources preloaded');
    });
Options for preCache():
embedFonts(boolean, default: true) — Inlines non-icon fonts during preload.reset(boolean, default: false) — Clears all existing internal caches.useProxy(string) — Proxy for handling CORS images as fallback.
- Captures shadow DOM and Web Components
- Supports
::before,::afterand::first-letterpseudo-elements - Inlines background images and fonts
- Handles Font Awesome, Material Icons, and more
data-capture="exclude"to ignore an elementdata-capture="placeholder"withdata-placeholder-textfor masked replacements
- External images shloud be CORS-accessible (use
useProxyoption for handling CORS denied) - Iframes are not supported
- When WebP format is used on Safari, it will fallback to PNG rendering.
@font-faceCSS rule is well supported, but if need to use JSFontFace(), see this workaround#43
Snapdom has received significant performance improvements since version v1.8.0. The following benchmarks compare:
- Snapdom (current)
- Snapdom v1.8.0
html2canvashtml-to-image
| Scenario | Snapdom (current) | Snapdom v1.8.0 | html2canvas | html-to-image |
|---|---|---|---|---|
| Small (200×100) | 0.4 ms | 1.2 ms | 70.3 ms | 3.6 ms |
| Modal (400×300) | 0.4 ms | 1.1 ms | 68.8 ms | 3.6 ms |
| Page View (1200×800) | 0.4 ms | 1.0 ms | 100.5 ms | 3.4 ms |
| Large Scroll (2000×1500) | 0.4 ms | 1.0 ms | 153.1 ms | 3.4 ms |
| Very Large (4000×2000) | 0.4 ms | 1.0 ms | 278.9 ms | 4.3 ms |
| Scenario | Snapdom (current) | Snapdom v1.8.0 | html2canvas | html-to-image |
|---|---|---|---|---|
| Small (200×100) | 1.1 ms | 3.2 ms | 76.0 ms | 15.3 ms |
| Modal (400×300) | 4.5 ms | 14.0 ms | 133.2 ms | 55.4 ms |
| Page View (1200×800) | 32.9 ms | 113.6 ms | 303.4 ms | 369.1 ms |
| Large Scroll (2000×1500) | 133.9 ms | 387.4 ms | 594.4 ms | 1,163.0 ms |
| Very Large (4000×2000) | 364.0 ms | 1,200.4 ms | 1,380.8 ms | 3,023.9 ms |
- Snapdom (current) is 2×–6× faster than
v1.8.0 - Up to 150× faster than
html2canvas - Up to 8× faster than
html-to-imagein large scenarios
Benchmarks run in Chromium using Vitest.
Hardware: MacBook Air 2018.
⚠️ Performance may vary depending on device.
git clone https://github.com/zumerlab/snapdom.git
cd snapdom
npm install
npm run test:benchmark
To contribute or build snapDOM locally:
# Clone the repository
git clone https://github.com/zumerlab/snapdom.git
cd snapdom

# Switch to dev branch
git checkout dev

# Install dependencies
npm install

# Compile the library (ESM, CJS, and minified versions)
npm run compile

# Install playwright browsers (necessary for running tests)
npx playwright install

# Run tests
npm test

# Run Benchmarks
npm run test:benchmark
The main entry point is in src/, and output bundles are generated in the dist/ folder.
For detailed contribution guidelines, please see CONTRIBUTING.


Special thanks to @megaphonecolin for supporting this project!
If you'd like to support this project too, you can become a sponsor.
MIT © Zumerlab